Inferno Smoke Lineups: 100 Throws Used by Pros
October 30, 2026 · 17 min read
On this page
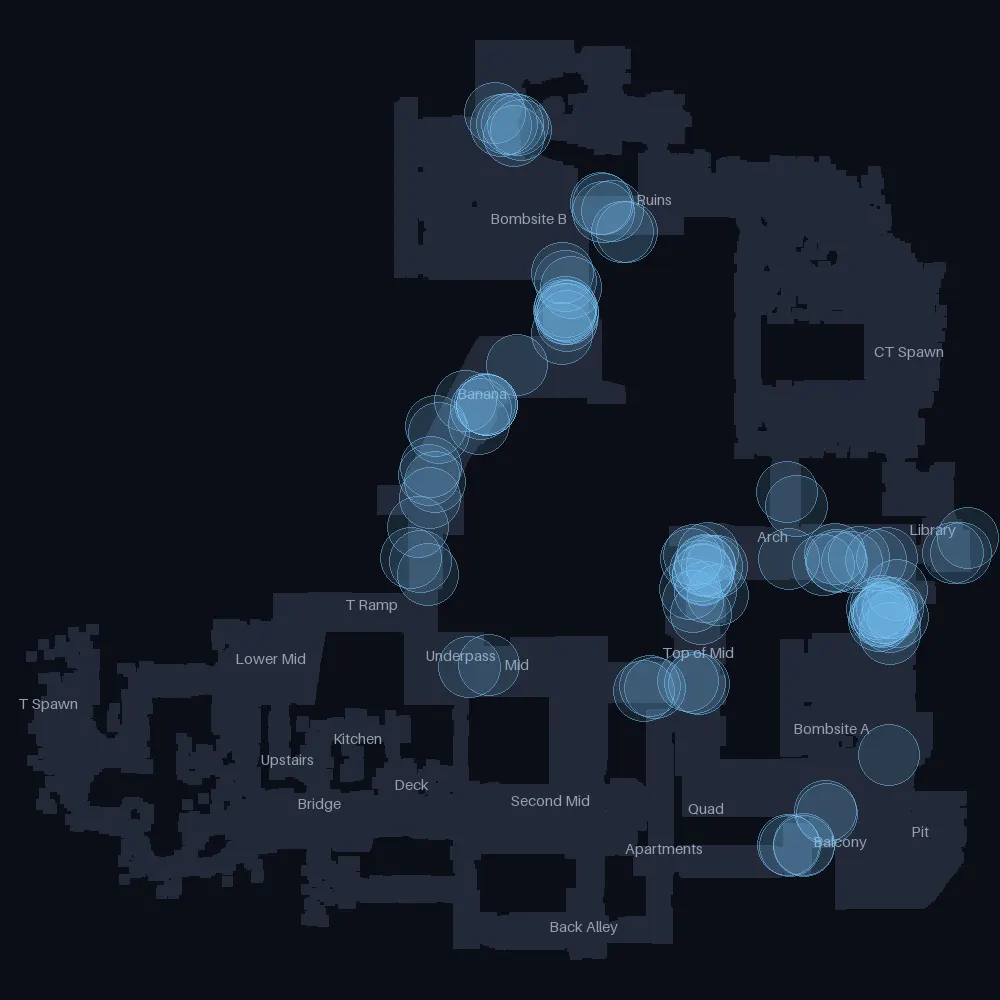
Inferno has 100 smoke lineups below, every one measured from real pro matches rather than copied from a list. Each was thrown from the same spot and angle at least three times, by at least two different players, and landed in the same place. They are sorted by side and by where the smoke lands, with the most-used throws first.
How to use these lineups
Each entry gives the technique and a console command that puts you on the exact spot, looking at the exact angle. To practise, start a local server and run:
sv_cheats 1
sv_infinite_ammo 1
sv_grenade_trajectory_prac_pipreview 1
give weapon_smokegrenade
Paste a lineup's command into the console, then throw with the technique listed. Note your crosshair position and what you are standing against, because the command won't work in a real match. For a jump throw, jump and release in the same moment.
To step through every lineup on this map, download the Inferno practice script, put it in your CS2 game/csgo/cfg folder, run exec lineups_inferno and press N to move to the next one.
In each diagram, the numbers mark where to stand and the blue circle marks where the smoke lands. Location names come from the game's own map data, so treat them as nearby areas rather than exact callouts. The diagrams are flat, so upper and lower floors overlap.
T side smokes
Top of Mid (T)
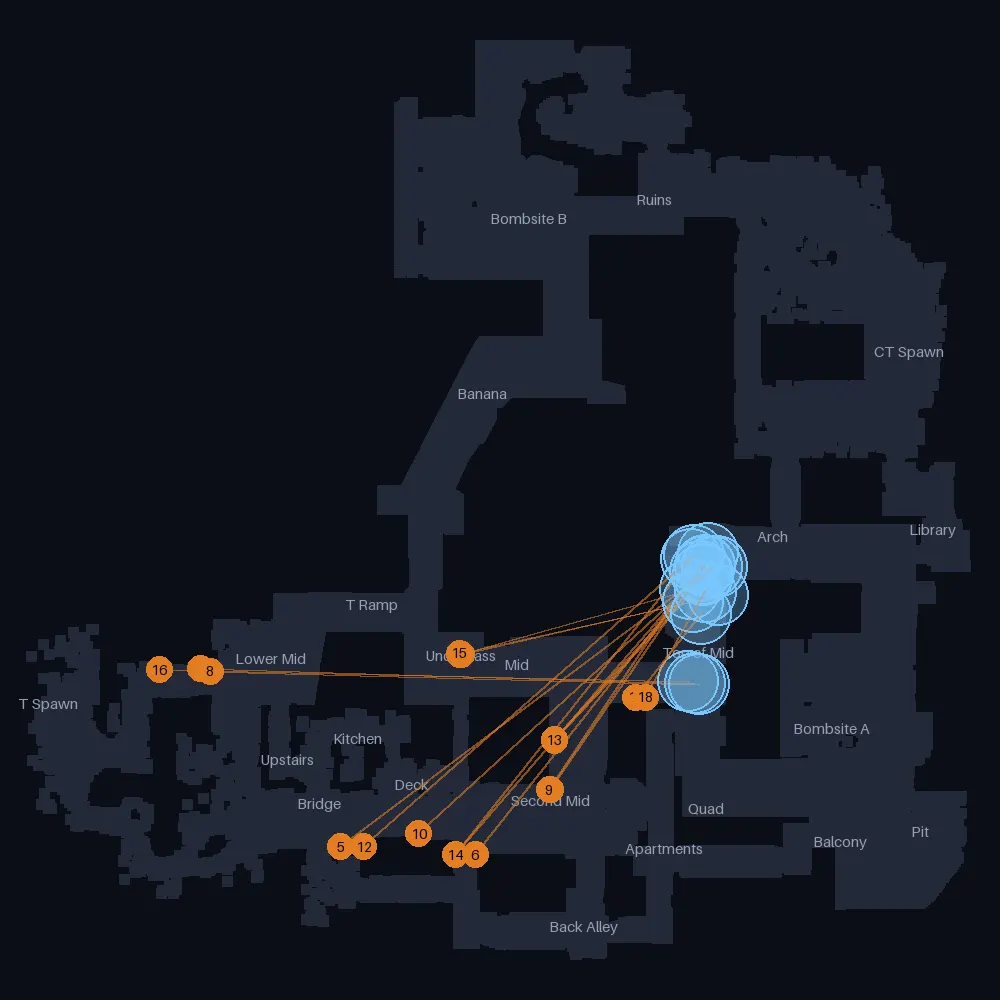
1. From Second Mid
- Technique: Stand still + left click.
- Time to pop: 6.0s after release. Usually thrown about 34s into the round.
- Pro use: 35 matching throws by 13 players in 21 maps
- Position:
setpos 729.07 244.46 91.87;setang -32.44 39.92 0
2. From Underpass
- Technique: Jump + left click.
- Time to pop: 8.1s after release. Usually thrown about 28s into the round.
- Pro use: 30 matching throws by 9 players in 17 maps
- Position:
setpos 292.93 648.04 16.50;setang -70.11 16.25 0
3. From Underpass
- Technique: Jump + left click.
- Time to pop: 8.9s after release. Usually thrown about 37s into the round.
- Pro use: 30 matching throws by 18 players in 17 maps
- Position:
setpos 284.06 648.03 17.42;setang -67.94 14.91 0
4. From T Spawn
- Technique: Jump + left click.
- Time to pop: 5.4s after release. Usually thrown about 6s into the round.
- Pro use: 28 matching throws by 11 players in 14 maps
- Position:
setpos -935.67 584.35 -29.72;setang -12.67 -1.76 0
5. From Second Mid
- Technique: Jump + left click.
- Time to pop: 7.3s after release. Usually thrown about 10s into the round.
- Pro use: 27 matching throws by 11 players in 16 maps
- Position:
setpos -276.97 -255.97 28.03;setang -36.79 33.05 0
6. From Second Mid
- Technique: Jump + left click.
- Time to pop: 6.0s after release. Usually thrown about 23s into the round.
- Pro use: 21 matching throws by 7 players in 12 maps
- Position:
setpos 356.97 -293.96 98.03;setang -19.97 42.91 0
7. From Second Mid
- Technique: Stand still + left click.
- Time to pop: 5.4s after release. Usually thrown about 35s into the round.
- Pro use: 17 matching throws by 9 players in 11 maps
- Position:
setpos 710.01 11.93 80.11;setang -53.20 50.50 0
8. From T Spawn
- Technique: Jump + left click.
- Time to pop: 5.3s after release. Usually thrown about 6s into the round.
- Pro use: 16 matching throws by 5 players in 7 maps
- Position:
setpos -890.24 569.93 -27.84;setang -11.38 -1.62 0
9. From Second Mid
- Technique: Stand still + left click.
- Time to pop: 7.4s after release. Usually thrown about 31s into the round.
- Pro use: 12 matching throws by 7 players in 7 maps
- Position:
setpos 705.63 11.93 79.87;setang -53.22 48.26 0
10. From Second Mid
- Technique: Jump + left click.
- Time to pop: 6.3s after release. Usually thrown about 14s into the round.
- Pro use: 10 matching throws by 4 players in 7 maps
- Position:
setpos 91.47 -195.22 51.68;setang -28.62 35.50 0
11. From Second Mid
- Technique: Jump + left click.
- Time to pop: 5.2s after release. Usually thrown about 37s into the round.
- Pro use: 8 matching throws by 3 players in 5 maps
- Position:
setpos 263.05 -293.97 99.03;setang -19.30 42.78 0
12. From Second Mid
- Technique: Jump + left click.
- Time to pop: 6.3s after release. Usually thrown about 10s into the round.
- Pro use: 7 matching throws by 2 players in 5 maps
- Position:
setpos -168.03 -255.96 33.10;setang -26.63 34.35 0
13. From Second Mid
- Technique: Jump + left click.
- Time to pop: 4.5s after release. Usually thrown about 35s into the round.
- Pro use: 7 matching throws by 4 players in 7 maps
- Position:
setpos 729.04 247.62 91.92;setang -1.38 36.43 0
14. From Second Mid
- Technique: Jump + left click.
- Time to pop: 6.2s after release. Usually thrown about 32s into the round.
- Pro use: 4 matching throws by 3 players in 3 maps
- Position:
setpos 263.03 -293.97 99.03;setang -24.14 41.15 0
15. From Underpass
- Technique: Jump + left click.
- Time to pop: 9.0s after release. Usually thrown about 32s into the round.
- Pro use: 4 matching throws by 3 players in 4 maps
- Position:
setpos 280.32 654.06 19.60;setang -67.58 11.32 0
16. From T Spawn
- Technique: Jump + left click. Release a moment after the jump rather than with it.
- Time to pop: 4.5s after release. Usually thrown about 5s into the round.
- Pro use: 3 matching throws by 2 players in 3 maps
- Position:
setpos -1130.25 575.93 -58.05;setang -5.92 -1.33 0
17. From Mid
- Technique: Stand still + left click.
- Time to pop: 1.7s after release. Usually thrown about 32s into the round.
- Pro use: 3 matching throws by 3 players in 3 maps
- Position:
setpos 1112.65 447.03 107.32;setang 2.29 39.55 0
18. From Mid
- Technique: Stand still + left click.
- Time to pop: 1.8s after release. Usually thrown about 50s into the round.
- Pro use: 3 matching throws by 3 players in 3 maps
- Position:
setpos 1156.73 447.06 110.45;setang 0.56 47.34 0
Banana (T)
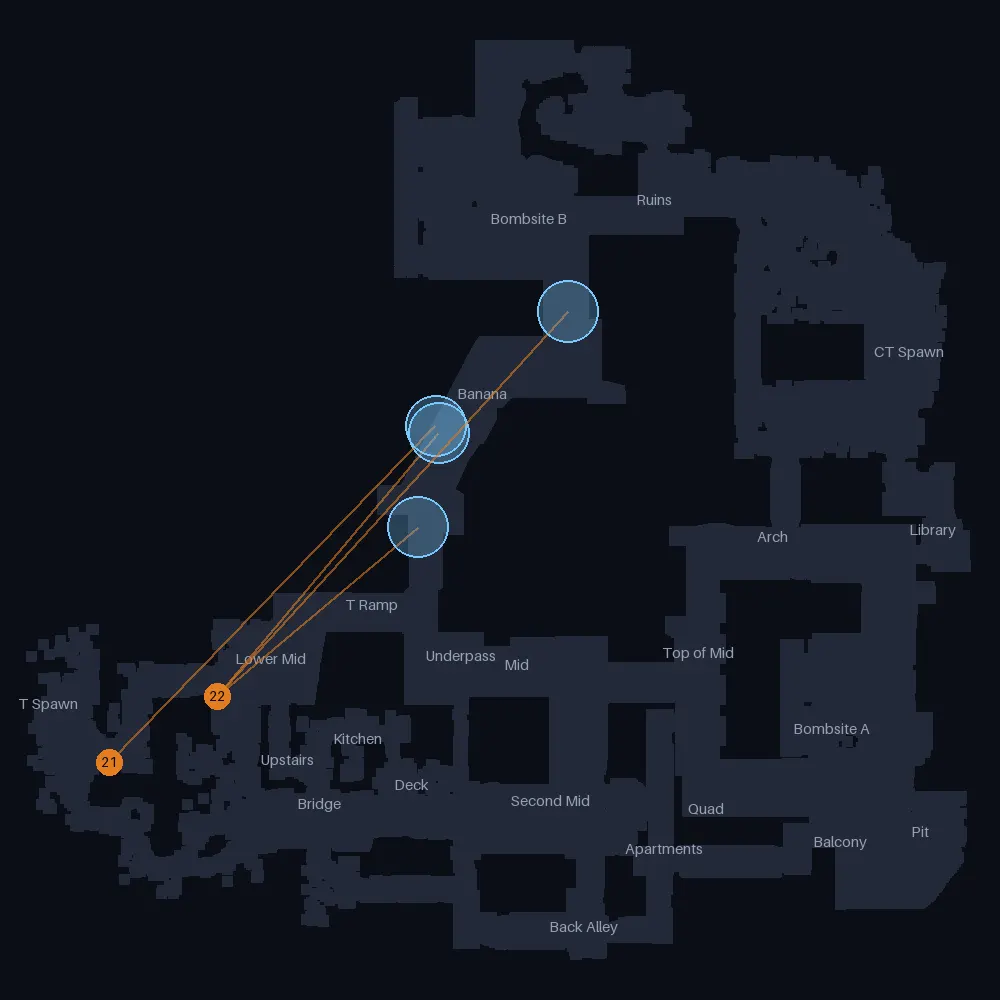
19. From Lower Mid
- Technique: Jump + left click.
- Time to pop: 3.3s after release. Usually thrown about 6s into the round.
- Pro use: 99 matching throws by 29 players in 34 maps
- Position:
setpos -858.97 450.64 -26.10;setang 1.09 33.05 0
20. From Lower Mid
- Technique: Jump + left click.
- Time to pop: 4.6s after release. Usually thrown about 6s into the round.
- Pro use: 82 matching throws by 15 players in 22 maps
- Position:
setpos -858.96 450.64 -26.10;setang -12.50 38.33 0
21. From T Spawn
- Technique: Jump + left click.
- Time to pop: 7.1s after release. Usually thrown about 4s into the round.
- Pro use: 68 matching throws by 30 players in 28 maps
- Position:
setpos -1366.38 141.04 -63.97;setang -46.44 39.10 0
22. From T Spawn
- Technique: Jump + left click.
- Time to pop: 8.2s after release. Usually thrown about 6s into the round.
- Pro use: 13 matching throws by 3 players in 6 maps
- Position:
setpos -858.96 450.65 -26.10;setang -44.84 47.63 0
Bombsite A (T)
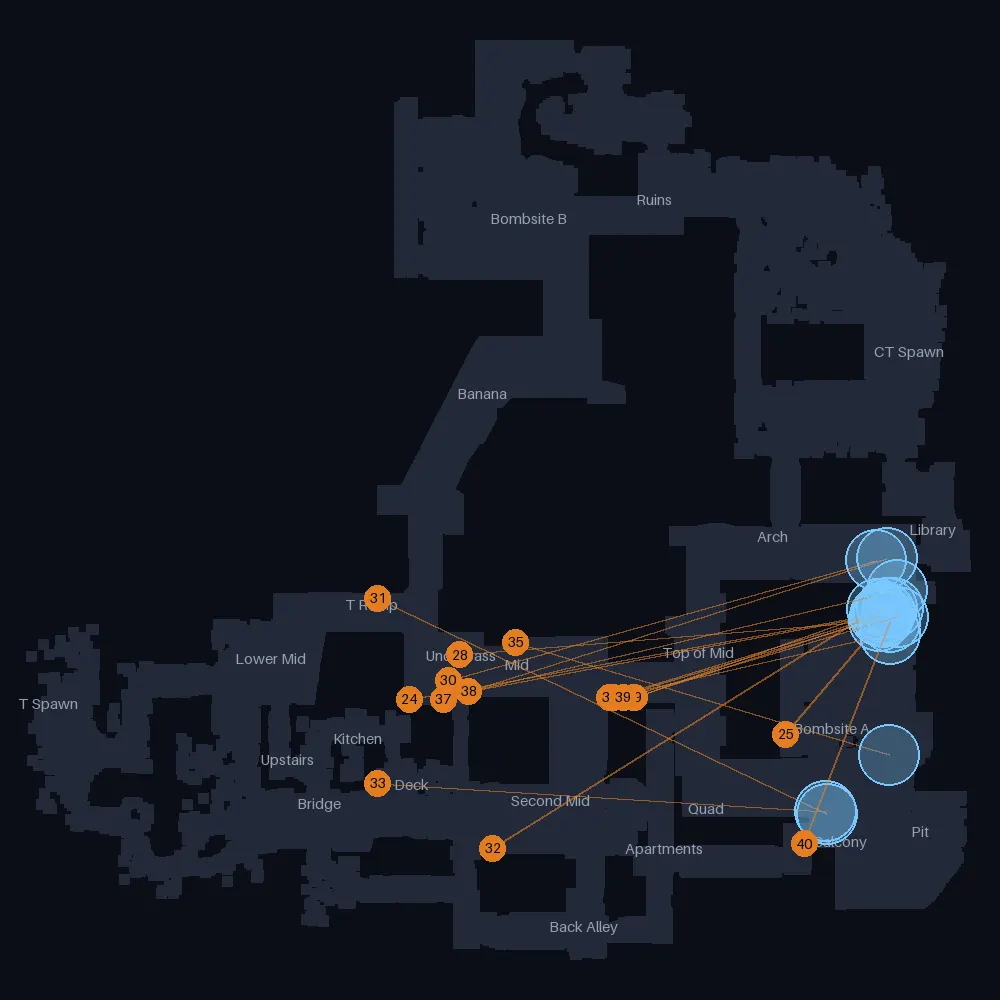
23. From Mid
- Technique: Jump + left click.
- Time to pop: 4.4s after release. Usually thrown about 56s into the round.
- Pro use: 20 matching throws by 11 players in 15 maps
- Position:
setpos 1008.00 447.03 99.07;setang -6.70 12.20 0
24. From Mid
- Technique: Jump + left click.
- Time to pop: 6.5s after release. Usually thrown about 36s into the round.
- Pro use: 19 matching throws by 10 players in 14 maps
- Position:
setpos 45.05 438.06 82.03;setang -39.61 9.06 0
25. From Bombsite A
- Technique: Crouch + left click.
- Time to pop: 2.2s after release. Usually thrown about 65s into the round.
- Pro use: 17 matching throws by 13 players in 13 maps
- Position:
setpos 1819.03 273.69 161.03;setang -5.67 39.66 0
26. From Mid
- Technique: Stand still + left click.
- Time to pop: 4.5s after release. Usually thrown about 59s into the round.
- Pro use: 14 matching throws by 8 players in 9 maps
- Position:
setpos 1101.11 447.05 106.44;setang -40.25 14.65 0
27. From Mid
- Technique: Jump + left click.
- Time to pop: 8.4s after release. Usually thrown about 38s into the round.
- Pro use: 12 matching throws by 7 players in 8 maps
- Position:
setpos 327.00 475.15 92.03;setang -37.88 8.69 0
28. From Underpass
- Technique: Jump + left click.
- Time to pop: 6.6s after release. Usually thrown about 35s into the round.
- Pro use: 10 matching throws by 6 players in 9 maps
- Position:
setpos 284.05 648.03 17.42;setang -41.56 3.97 0
29. From Mid
- Technique: Stand still + left click.
- Time to pop: 4.7s after release. Usually thrown about 78s into the round.
- Pro use: 10 matching throws by 7 players in 9 maps
- Position:
setpos 1104.07 447.06 106.67;setang -44.00 16.41 0
30. From Mid
- Technique: Jump + left click.
- Time to pop: 6.3s after release. Usually thrown about 46s into the round.
- Pro use: 7 matching throws by 3 players in 5 maps
- Position:
setpos 229.77 526.03 86.65;setang -34.34 13.96 0
31. From T Ramp
- Technique: Jump + left click.
- Time to pop: 4.9s after release. Usually thrown about 69s into the round.
- Pro use: 6 matching throws by 4 players in 5 maps
- Position:
setpos -103.56 913.45 61.24;setang -22.04 -26.02 0
32. From Second Mid
- Technique: Jump + left click.
- Time to pop: 5.6s after release. Usually thrown about 28s into the round.
- Pro use: 6 matching throws by 3 players in 5 maps
- Position:
setpos 438.64 -264.94 92.64;setang -25.27 27.73 0
33. From Deck
- Technique: Jump + left click.
- Time to pop: 4.2s after release. Usually thrown about 36s into the round.
- Pro use: 5 matching throws by 3 players in 4 maps
- Position:
setpos -102.97 43.06 209.70;setang -10.16 -2.93 0
34. From Mid
- Technique: Crouch + left click.
- Time to pop: 4.2s after release. Usually thrown about 53s into the round.
- Pro use: 5 matching throws by 2 players in 4 maps
- Position:
setpos 988.25 447.05 97.40;setang -37.50 11.55 0
35. From Mid
- Technique: Jump + left click.
- Time to pop: 4.9s after release. Usually thrown about 31s into the round.
- Pro use: 4 matching throws by 4 players in 4 maps
- Position:
setpos 546.03 705.96 98.16;setang -11.09 -14.66 0
36. From Mid
- Technique: Jump + left click.
- Time to pop: 4.3s after release. Usually thrown about 55s into the round.
- Pro use: 4 matching throws by 4 players in 4 maps
- Position:
setpos 992.84 447.07 97.79;setang -6.60 12.40 0
37. From Mid
- Technique: Jump + left click.
- Time to pop: 5.7s after release. Usually thrown about 54s into the round.
- Pro use: 3 matching throws by 2 players in 1 maps
- Position:
setpos 205.97 436.81 82.03;setang -32.77 15.75 0
38. From Mid
- Technique: Jump + left click.
- Time to pop: 5.5s after release. Usually thrown about 64s into the round.
- Pro use: 3 matching throws by 2 players in 2 maps
- Position:
setpos 325.20 475.06 92.03;setang -23.38 11.48 0
39. From Mid
- Technique: Stand still + left click.
- Time to pop: 3.9s after release. Usually thrown about 47s into the round.
- Pro use: 3 matching throws by 3 players in 3 maps
- Position:
setpos 1053.68 447.03 102.84;setang -39.31 14.16 0
40. From Apartments
- Technique: Stand still + left click.
- Time to pop: 3.4s after release. Usually thrown about 37s into the round.
- Pro use: 3 matching throws by 2 players in 3 maps
- Position:
setpos 1905.41 -243.47 260.03;setang -5.39 59.18 0
Ruins (T)
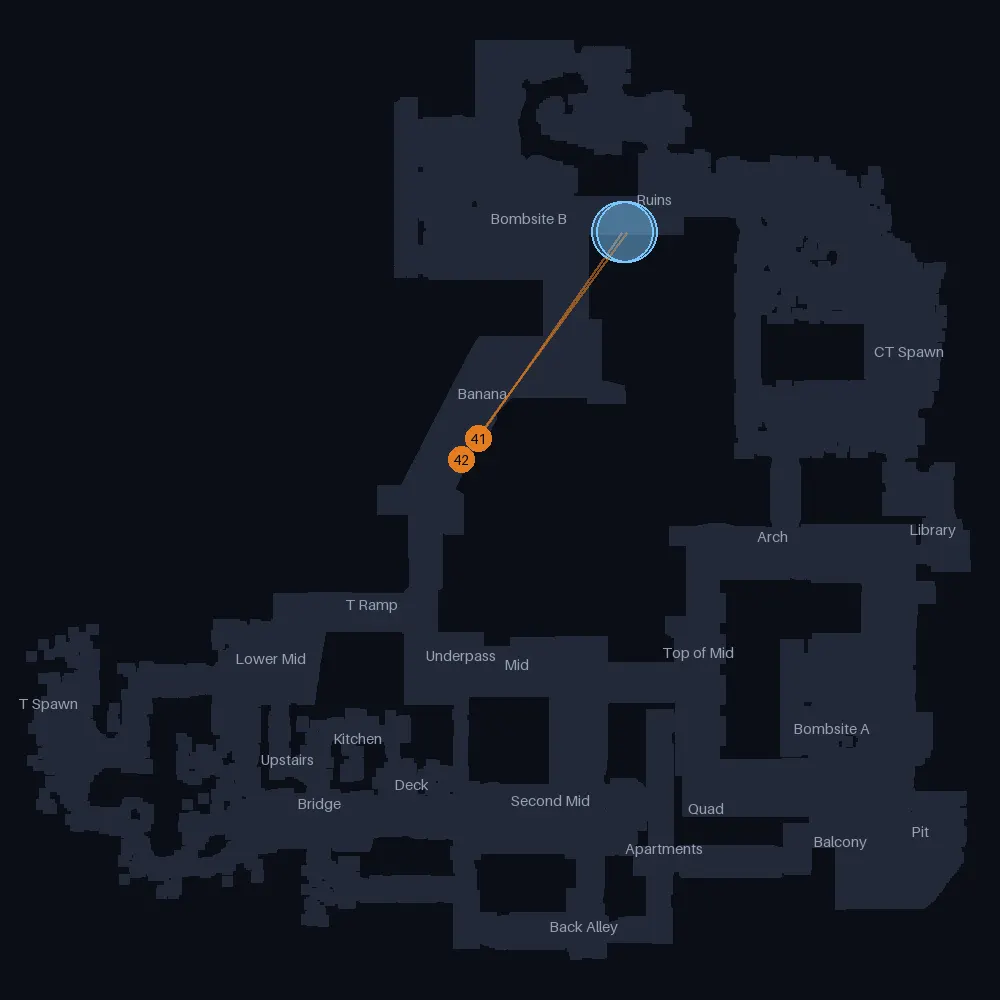
41. From Banana
- Technique: Jump + left + right click.
- Time to pop: 4.9s after release. Usually thrown about 56s into the round.
- Pro use: 82 matching throws by 36 players in 33 maps
- Position:
setpos 369.53 1664.05 134.03;setang -13.67 64.44 0
42. From Banana
- Technique: Stand still + left click.
- Time to pop: 4.6s after release. Usually thrown about 66s into the round.
- Pro use: 43 matching throws by 14 players in 25 maps
- Position:
setpos 290.06 1564.40 125.65;setang -29.66 63.18 0
Bombsite B (T)
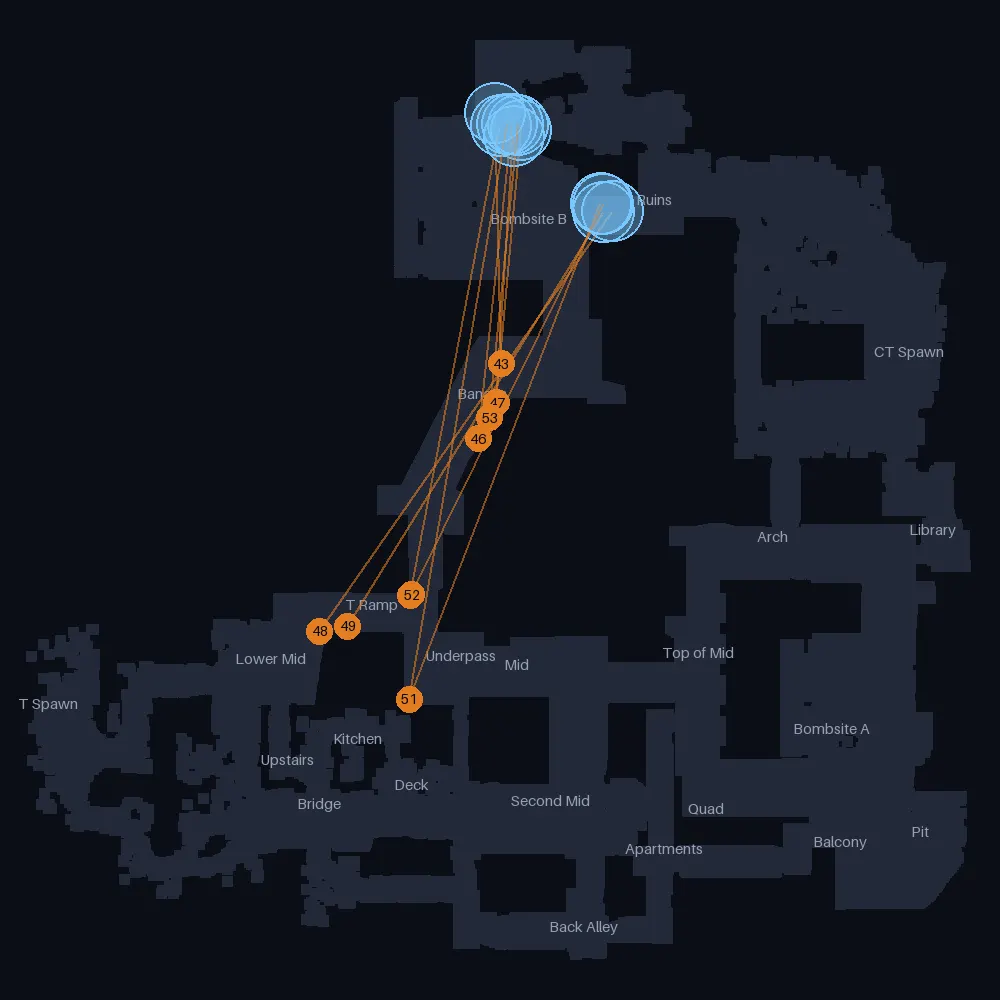
43. From Banana
- Technique: Jump + left + right click.
- Time to pop: 6.0s after release. Usually thrown about 75s into the round.
- Pro use: 51 matching throws by 27 players in 29 maps
- Position:
setpos 479.05 2016.94 136.03;setang -42.87 86.24 0
44. From Mid
- Technique: Jump + left click.
- Time to pop: 7.6s after release. Usually thrown about 53s into the round.
- Pro use: 15 matching throws by 10 players in 13 maps
- Position:
setpos 53.71 925.19 81.26;setang -49.17 79.17 0
45. From Banana
- Technique: Jump + left click.
- Time to pop: 3.7s after release. Usually thrown about 64s into the round.
- Pro use: 9 matching throws by 4 players in 6 maps
- Position:
setpos 457.27 1833.36 136.03;setang -1.11 85.08 0
46. From Banana
- Technique: Jump + left click.
- Time to pop: 4.4s after release. Usually thrown about 76s into the round.
- Pro use: 6 matching throws by 2 players in 3 maps
- Position:
setpos 369.51 1664.03 134.03;setang -0.61 79.68 0
47. From Banana
- Technique: Jump + left + right click.
- Time to pop: 5.4s after release. Usually thrown about 55s into the round.
- Pro use: 5 matching throws by 3 players in 4 maps
- Position:
setpos 457.27 1833.31 136.03;setang -16.65 85.27 0
48. From Lower Mid
- Technique: Jump + left click.
- Time to pop: 6.1s after release. Usually thrown about 14s into the round.
- Pro use: 4 matching throws by 4 players in 4 maps
- Position:
setpos -375.14 756.48 -2.85;setang -38.13 55.08 0
49. From T Ramp
- Technique: Jump + left click.
- Time to pop: 6.4s after release. Usually thrown about 35s into the round.
- Pro use: 4 matching throws by 3 players in 3 maps
- Position:
setpos -243.73 780.03 29.73;setang -34.78 60.14 0
50. From Mid
- Technique: Jump + left click.
- Time to pop: 6.5s after release. Usually thrown about 61s into the round.
- Pro use: 4 matching throws by 3 players in 4 maps
- Position:
setpos 45.04 438.10 82.03;setang -29.30 80.24 0
51. From Mid
- Technique: Jump + left click.
- Time to pop: 6.8s after release. Usually thrown about 55s into the round.
- Pro use: 3 matching throws by 3 players in 3 maps
- Position:
setpos 45.06 438.03 82.03;setang -37.94 69.05 0
52. From Mid
- Technique: Jump + left click.
- Time to pop: 7.8s after release. Usually thrown about 45s into the round.
- Pro use: 3 matching throws by 2 players in 2 maps
- Position:
setpos 58.62 930.40 82.03;setang -53.66 64.94 0
53. From Banana
- Technique: Jump + left click.
- Time to pop: 5.0s after release. Usually thrown about 69s into the round.
- Pro use: 3 matching throws by 2 players in 3 maps
- Position:
setpos 423.73 1761.98 134.03;setang -20.46 82.81 0
Arch (T)
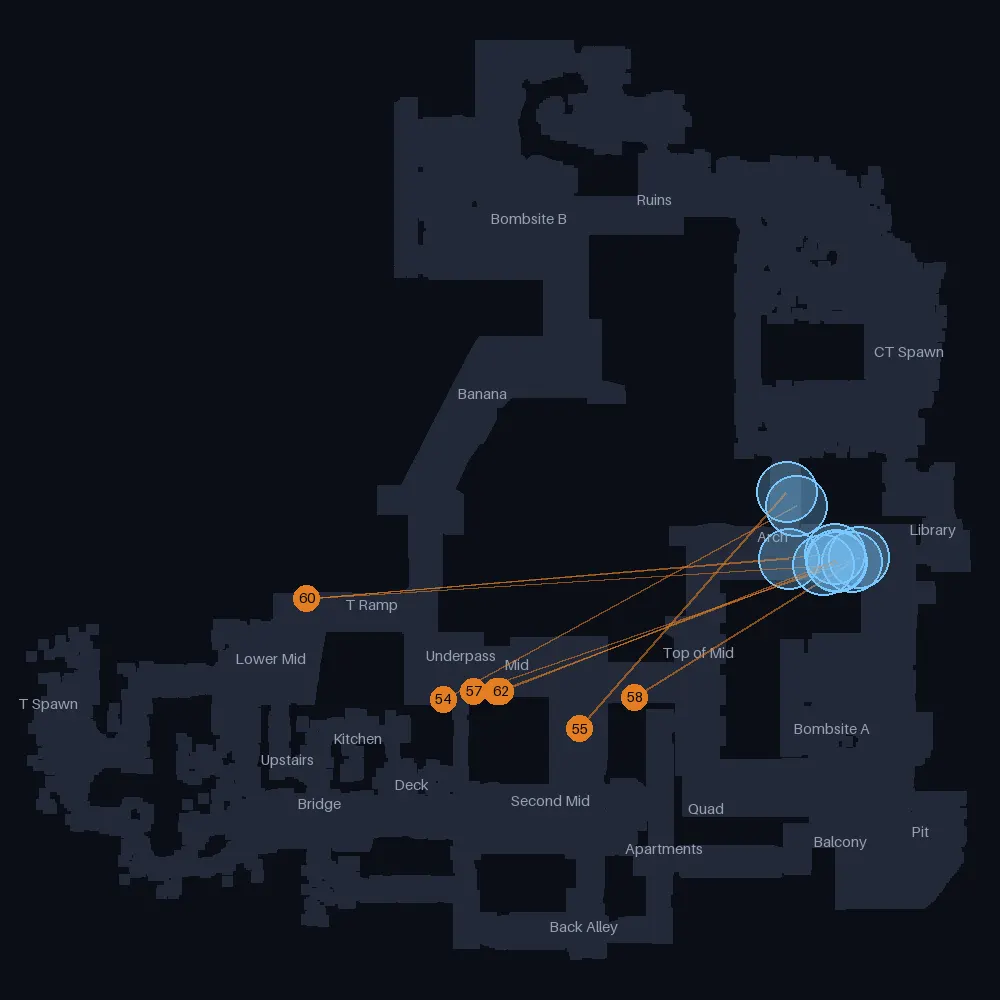
54. From Mid
- Technique: Jump + left click.
- Time to pop: 10.2s after release. Usually thrown about 62s into the round.
- Pro use: 40 matching throws by 18 players in 26 maps
- Position:
setpos 205.97 436.81 82.03;setang -59.04 19.96 0
55. From Second Mid
- Technique: Stand still + left click.
- Time to pop: 4.4s after release. Usually thrown about 57s into the round.
- Pro use: 25 matching throws by 12 players in 18 maps
- Position:
setpos 848.96 297.96 92.99;setang -36.41 45.22 0
56. From T Ramp
- Technique: Jump + left click.
- Time to pop: 7.4s after release. Usually thrown about 56s into the round.
- Pro use: 10 matching throws by 5 players in 6 maps
- Position:
setpos -437.97 913.26 -16.88;setang -45.99 7.18 0
57. From Mid
- Technique: Jump + left click.
- Time to pop: 6.2s after release. Usually thrown about 52s into the round.
- Pro use: 5 matching throws by 2 players in 4 maps
- Position:
setpos 349.65 475.07 92.03;setang -24.55 15.97 0
58. From Mid
- Technique: Stand still + left click.
- Time to pop: 5.9s after release. Usually thrown about 56s into the round.
- Pro use: 5 matching throws by 3 players in 4 maps
- Position:
setpos 1107.53 447.03 106.93;setang -51.99 44.29 0
59. From T Ramp
- Technique: Jump + left click.
- Time to pop: 6.6s after release. Usually thrown about 38s into the round.
- Pro use: 4 matching throws by 2 players in 4 maps
- Position:
setpos -437.97 913.26 -16.88;setang -34.76 5.82 0
60. From T Ramp
- Technique: Jump + left click.
- Time to pop: 7.1s after release. Usually thrown about 9s into the round.
- Pro use: 4 matching throws by 4 players in 4 maps
- Position:
setpos -437.95 913.16 -16.89;setang -40.52 3.10 0
61. From Mid
- Technique: Jump + left click.
- Time to pop: 6.7s after release. Usually thrown about 62s into the round.
- Pro use: 4 matching throws by 2 players in 3 maps
- Position:
setpos 454.64 475.06 92.43;setang -25.98 15.66 0
62. From Mid
- Technique: Jump + left click.
- Time to pop: 6.8s after release. Usually thrown about 49s into the round.
- Pro use: 3 matching throws by 2 players in 2 maps
- Position:
setpos 476.93 475.03 93.09;setang -26.21 16.14 0
Library (T)
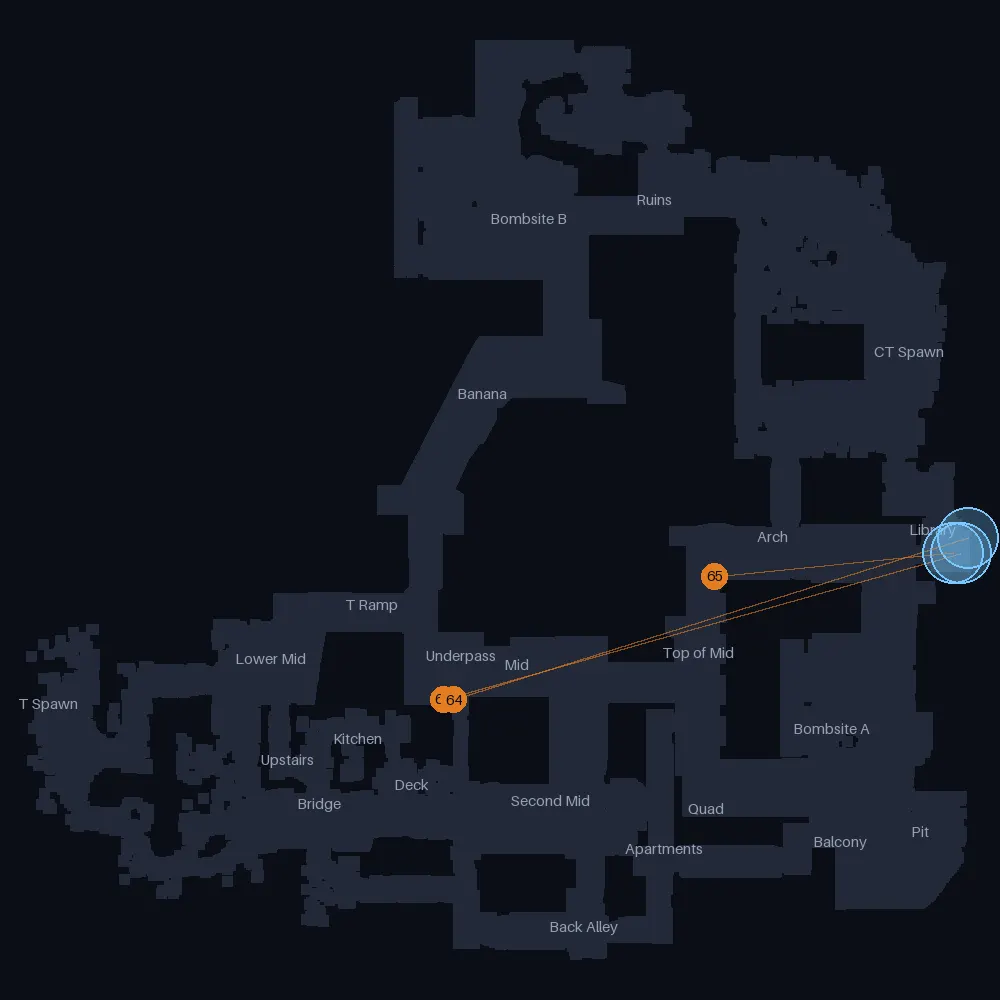
63. From Mid
- Technique: Jump + left click.
- Time to pop: 6.9s after release. Usually thrown about 59s into the round.
- Pro use: 68 matching throws by 26 players in 32 maps
- Position:
setpos 205.97 436.81 82.03;setang -32.81 17.71 0
64. From Mid
- Technique: Jump + left click.
- Time to pop: 6.4s after release. Usually thrown about 65s into the round.
- Pro use: 3 matching throws by 3 players in 2 maps
- Position:
setpos 256.04 435.70 92.03;setang -29.99 17.22 0
65. From Top of Mid
- Technique: Stand still + left click.
- Time to pop: 2.7s after release. Usually thrown about 76s into the round.
- Pro use: 3 matching throws by 2 players in 3 maps
- Position:
setpos 1484.88 1016.91 154.53;setang -4.38 6.05 0
CT side smokes
Banana (CT)
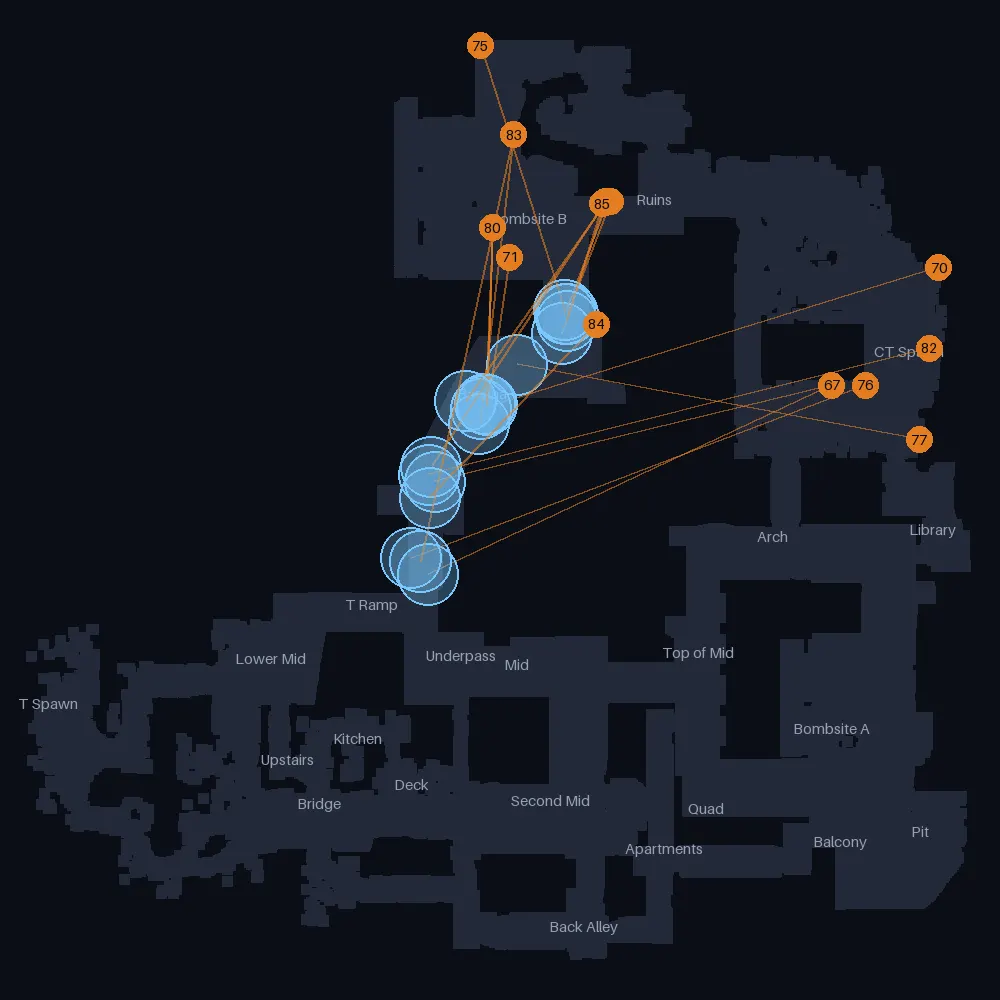
66. From CT Spawn
- Technique: Jump + left click.
- Time to pop: 6.6s after release. Usually thrown about 3s into the round.
- Pro use: 306 matching throws by 60 players in 43 maps
- Position:
setpos 2035.89 1914.96 140.28;setang -38.59 -158.12 0
67. From CT Spawn
- Technique: Jump + left click.
- Time to pop: 7.1s after release. Usually thrown about 4s into the round.
- Pro use: 126 matching throws by 38 players in 38 maps
- Position:
setpos 2035.97 1914.97 140.23;setang -40.24 -167.65 0
68. From Bombsite B
- Technique: Stand still + left click.
- Time to pop: 1.8s after release. Usually thrown about 55s into the round.
- Pro use: 97 matching throws by 39 players in 36 maps
- Position:
setpos 994.30 2779.93 131.75;setang 2.66 -128.32 0
69. From Bombsite B
- Technique: Jump + left click.
- Time to pop: 3.6s after release. Usually thrown about 34s into the round.
- Pro use: 74 matching throws by 23 players in 30 maps
- Position:
setpos 436.04 2656.97 164.03;setang -7.17 -120.68 0
70. From CT Spawn
- Technique: Jump + left click.
- Time to pop: 6.2s after release. Usually thrown about 3s into the round.
- Pro use: 64 matching throws by 21 players in 27 maps
- Position:
setpos 2537.97 2468.32 125.71;setang -24.44 -168.40 0
71. From Bombsite B
- Technique: Stand still + left + right click.
- Time to pop: 4.1s after release. Usually thrown about 34s into the round.
- Pro use: 18 matching throws by 7 players in 13 maps
- Position:
setpos 518.12 2518.67 279.03;setang -57.52 -98.57 0
72. From Bombsite B
- Technique: Stand still + left click.
- Time to pop: 1.9s after release. Usually thrown about 49s into the round.
- Pro use: 16 matching throws by 9 players in 14 maps
- Position:
setpos 971.24 2779.93 132.57;setang 1.72 -120.55 0
73. From Bombsite B
- Technique: Jump + left click.
- Time to pop: 3.4s after release. Usually thrown about 34s into the round.
- Pro use: 15 matching throws by 8 players in 11 maps
- Position:
setpos 537.19 3094.05 213.03;setang 8.03 -96.38 0
74. From Bombsite B
- Technique: Stand still + left click.
- Time to pop: 1.9s after release. Usually thrown about 49s into the round.
- Pro use: 13 matching throws by 10 players in 10 maps
- Position:
setpos 979.22 2779.94 132.33;setang 3.33 -126.45 0
75. From Bombsite B
- Technique: Stand still + left click.
- Time to pop: 3.1s after release. Usually thrown about 62s into the round.
- Pro use: 11 matching throws by 5 players in 7 maps
- Position:
setpos 381.05 3513.94 164.49;setang -5.83 -72.35 0
76. From CT Spawn
- Technique: Jump + left click.
- Time to pop: 7.0s after release. Usually thrown about 3s into the round.
- Pro use: 10 matching throws by 3 players in 4 maps
- Position:
setpos 2191.93 1914.97 138.31;setang -36.53 -161.63 0
77. From CT Spawn
- Technique: Jump + left click.
- Time to pop: 7.8s after release. Usually thrown about 3s into the round.
- Pro use: 10 matching throws by 5 players in 8 maps
- Position:
setpos 2446.97 1660.21 182.89;setang -12.67 171.09 0
78. From Bombsite B
- Technique: Jump + left click.
- Time to pop: 3.7s after release. Usually thrown about 28s into the round.
- Pro use: 9 matching throws by 2 players in 4 maps
- Position:
setpos 436.05 2656.97 164.03;setang -11.81 -118.86 0
79. From Bombsite B
- Technique: Stand still + left click.
- Time to pop: 3.3s after release. Usually thrown about 11s into the round.
- Pro use: 9 matching throws by 3 players in 4 maps
- Position:
setpos 971.29 2779.96 132.57;setang -27.98 -124.52 0
80. From Bombsite B
- Technique: Jump + left + right click.
- Time to pop: 6.0s after release. Usually thrown about 38s into the round.
- Pro use: 7 matching throws by 2 players in 3 maps
- Position:
setpos 436.06 2656.96 164.03;setang -61.07 -91.84 0
81. From Bombsite B
- Technique: Jump + left + right click.
- Time to pop: 4.1s after release. Usually thrown about 36s into the round.
- Pro use: 5 matching throws by 3 players in 5 maps
- Position:
setpos 972.70 2779.94 132.52;setang -4.23 -130.91 0
82. From CT Spawn
- Technique: Jump + left click.
- Time to pop: 11.2s after release. Usually thrown as the round starts.
- Pro use: 4 matching throws by 4 players in 3 maps
- Position:
setpos 2493.00 2090.00 132.55;setang -39.59 -166.95 0
83. From Bombsite B
- Technique: Jump + left click.
- Time to pop: 4.5s after release. Usually thrown about 36s into the round.
- Pro use: 3 matching throws by 3 players in 3 maps
- Position:
setpos 537.22 3094.03 213.03;setang 7.93 -102.05 0
84. From Banana
- Technique: Stand still + left click.
- Time to pop: 3.6s after release. Usually thrown about 31s into the round.
- Pro use: 3 matching throws by 2 players in 2 maps
- Position:
setpos 926.96 2203.97 136.37;setang -12.83 -147.04 0
85. From Bombsite B
- Technique: Stand still + left click.
- Time to pop: 1.9s after release. Usually thrown about 60s into the round.
- Pro use: 3 matching throws by 3 players in 3 maps
- Position:
setpos 954.28 2770.21 133.07;setang 2.86 -124.15 0
Mid (CT)
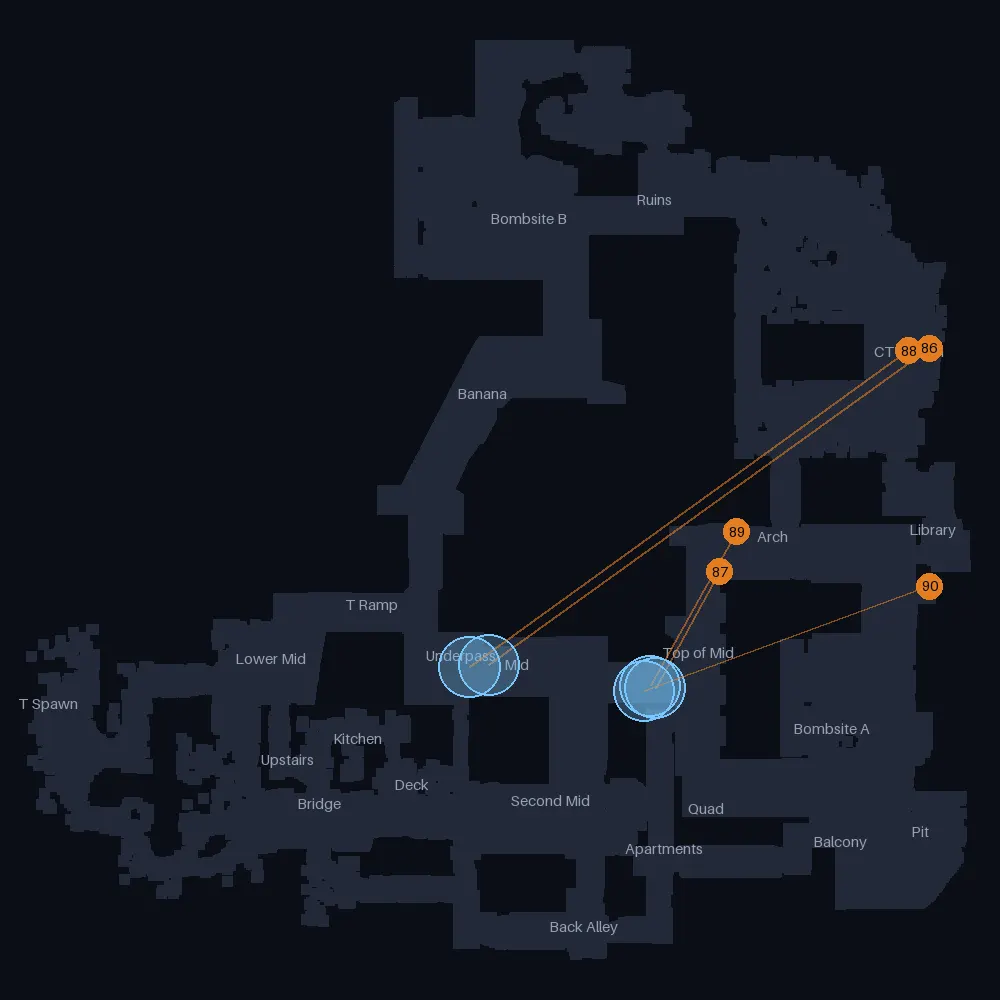
86. From CT Spawn
- Technique: Jump + left click.
- Time to pop: 5.9s after release. Usually thrown as the round starts.
- Pro use: 48 matching throws by 34 players in 28 maps
- Position:
setpos 2493.00 2090.00 132.55;setang -29.36 -140.13 0
87. From Top of Mid
- Technique: Stand still + left click.
- Time to pop: 1.7s after release. Usually thrown about 20s into the round.
- Pro use: 5 matching throws by 4 players in 5 maps
- Position:
setpos 1506.47 1038.42 156.39;setang 5.65 -114.38 0
88. From CT Spawn
- Technique: Jump + left click.
- Time to pop: 5.6s after release. Usually thrown as the round starts.
- Pro use: 5 matching throws by 3 players in 3 maps
- Position:
setpos 2397.00 2079.00 132.77;setang -27.13 -140.37 0
89. From Arch
- Technique: Stand still + left click.
- Time to pop: 2.4s after release. Usually thrown about 31s into the round.
- Pro use: 3 matching throws by 2 players in 3 maps
- Position:
setpos 1588.11 1225.75 177.03;setang 3.70 -114.49 0
90. From Bombsite A
- Technique: Jump + left + right click.
- Time to pop: 5.7s after release. Usually thrown about 49s into the round.
- Pro use: 3 matching throws by 3 players in 3 maps
- Position:
setpos 2496.94 969.97 172.31;setang -29.83 -159.65 0
Bombsite B (CT)
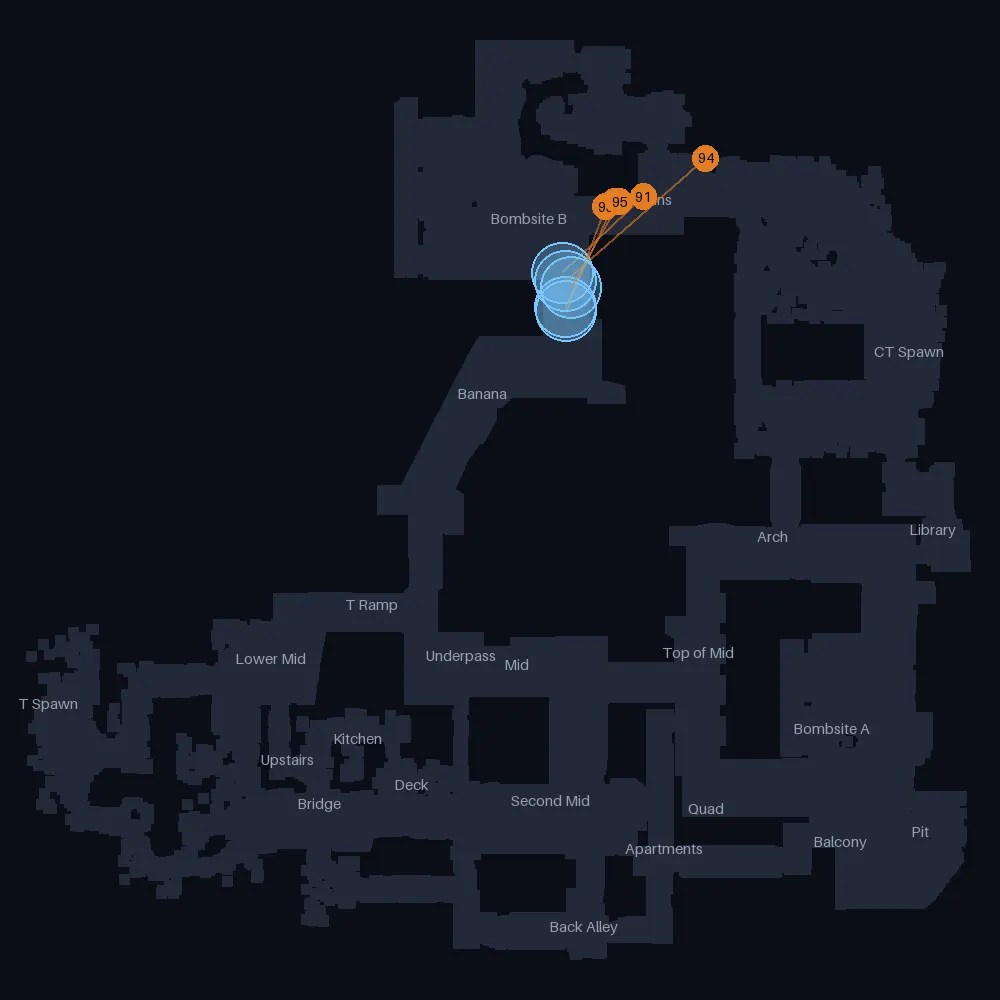
91. From Ruins
- Technique: Stand still + left click.
- Time to pop: 1.9s after release. Usually thrown about 73s into the round.
- Pro use: 9 matching throws by 7 players in 7 maps
- Position:
setpos 1148.03 2804.29 128.70;setang 1.16 -148.99 0
92. From Bombsite B
- Technique: Stand still + left click.
- Time to pop: 1.8s after release. Usually thrown about 48s into the round.
- Pro use: 9 matching throws by 8 players in 9 maps
- Position:
setpos 1011.99 2779.92 130.75;setang 3.36 -130.75 0
93. From Bombsite B
- Technique: Stand still + left click.
- Time to pop: 1.7s after release. Usually thrown about 63s into the round.
- Pro use: 6 matching throws by 5 players in 6 maps
- Position:
setpos 970.87 2756.02 132.58;setang 4.20 -128.37 0
94. From Ruins
- Technique: Stand still + left click.
- Time to pop: 2.6s after release. Usually thrown about 63s into the round.
- Pro use: 4 matching throws by 4 players in 4 maps
- Position:
setpos 1441.97 2983.95 128.03;setang -9.55 -148.14 0
95. From Ruins
- Technique: Stand still + left click.
- Time to pop: 2.0s after release. Usually thrown about 64s into the round.
- Pro use: 3 matching throws by 2 players in 2 maps
- Position:
setpos 1035.87 2779.93 129.39;setang 1.71 -143.98 0
Apartments (CT)

96. From Balcony
- Technique: Stand still + left click.
- Time to pop: 1.5s after release. Usually thrown about 49s into the round.
- Pro use: 10 matching throws by 8 players in 9 maps
- Position:
setpos 2109.66 -278.53 290.53;setang 17.94 148.17 0
97. From Balcony
- Technique: Stand still + left click.
- Time to pop: 1.2s after release. Usually thrown about 48s into the round.
- Pro use: 9 matching throws by 6 players in 7 maps
- Position:
setpos 2106.82 -276.27 290.53;setang 13.37 148.52 0
98. From Pit
- Technique: Stand still + left click.
- Time to pop: 2.2s after release. Usually thrown about 58s into the round.
- Pro use: 3 matching throws by 3 players in 3 maps
- Position:
setpos 2566.77 -119.31 92.89;setang -18.87 -171.41 0
99. From Pit
- Technique: Stand still + left click.
- Time to pop: 2.2s after release. Usually thrown about 69s into the round.
- Pro use: 3 matching throws by 2 players in 2 maps
- Position:
setpos 2575.47 -130.69 93.58;setang -18.75 -172.55 0
Bombsite A (CT)
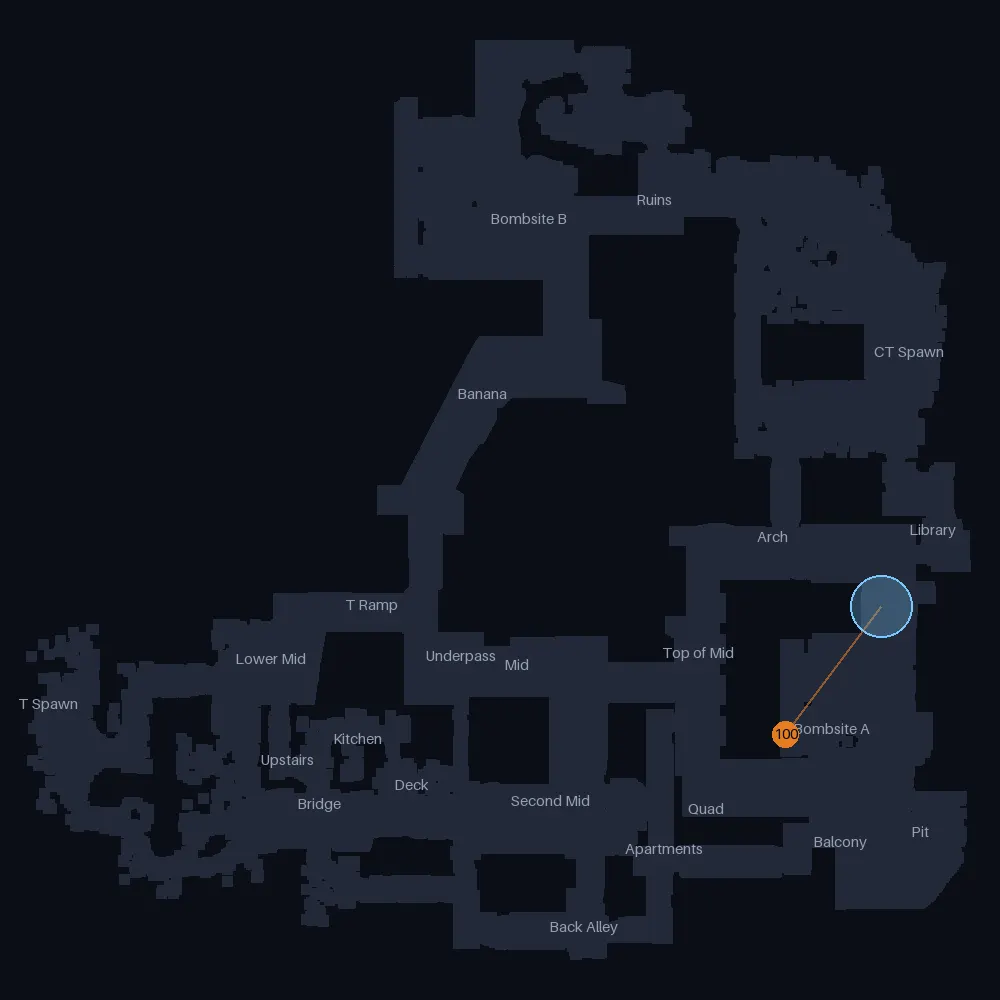
100. From Bombsite A
- Technique: Crouch + left click.
- Time to pop: 2.6s after release. Usually thrown about 63s into the round.
- Pro use: 3 matching throws by 3 players in 3 maps
- Position:
setpos 1819.08 273.69 161.03;setang -4.80 38.24 0
About this data
These lineups come from player positions, view angles and smoke landing points recorded in demos from IEM Cologne Major 2026 and other 2026 pro matches, taken from the public cs2-demos archive. They only cover throws pros repeated from a standing start, so they are not every possible smoke on the map. A later map update can move a landing spot, so check a lineup in practice before relying on it.